Teaching in Other Peoples’ Spaces #2: What About My Anchor Charts?

Where Have My Anchor Charts gone-

The second in a series of posts about how to adapt to teaching in other people’s spaces. For all of us pushing carts, lugging markers & chart paper, and scampering around the school to get to our classes.

I spent the summer coming up with all sorts of ideas for my English class.

  • A shelfie bulletin board to celebrate independent reading!
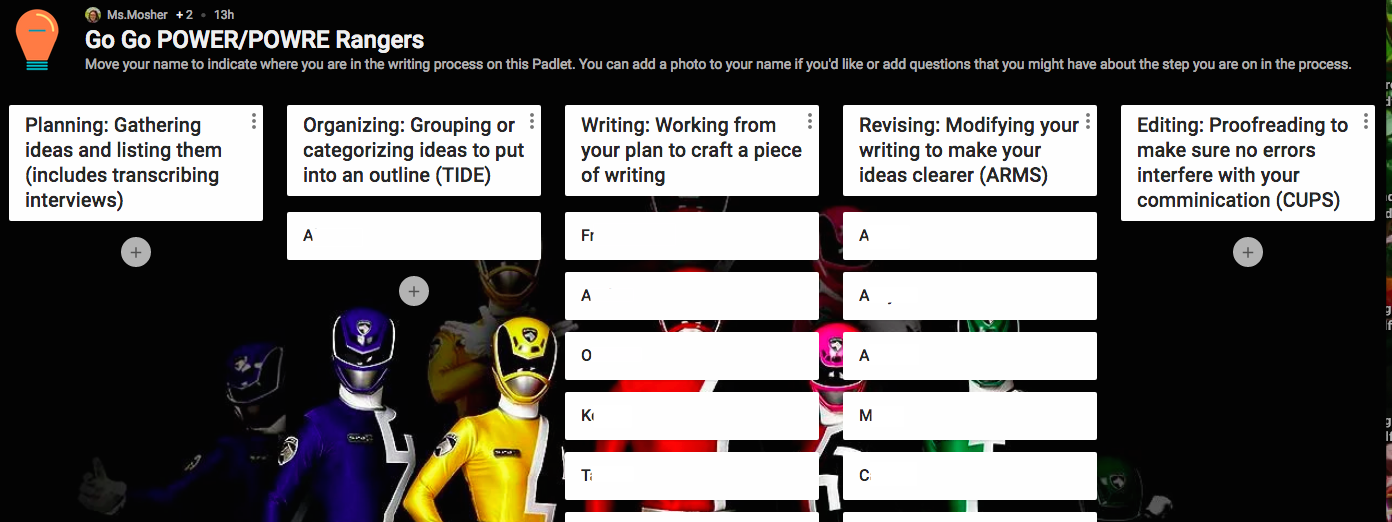
  • Using the whiteboard and/or chart paper to keep track of our movement through the writing process!
  • Strategies, strategies, strategies!

It was going to be awesome.

I also had ideas from two of my summer teacher books, Deliberate Optimism and Peer Feedback in the Classroom about how to develop a classroom culture that was supportive, welcoming, and respectful. Both books put a lot of emphasis on sharing who you are as person to help make a connection with your students. And a lot of that connection building revolved around sharing who you are through bulletin boards and other displays. Both authors also considered agreements central to developing a safe and respectful classroom space. I agree, but where do they go when you don’t have walls of your own? Or even the same walls every class?

Agreements

Figuring out the agreements was actually the easiest part. Kevin, my colleague in whose classroom I teach 2/3 of my English classes, offered me some wall space. Once my class and I had created agreements, we posted them there. Then I snapped a photo with my phone so I could project the image onto the screen in the other classroom. This has its challenges. For example, the agreements can’t be visible at the same time as other classroom media. This makes simply pointing to the agreements to indicate to students that they need to check in with the agreements and their own actions or behavior difficult. The best solution I’ve come up with so far is to have the picture on a separate desktop on my laptop and swipe to it when necessary.

Bulletin Boards

Here’s where technology becomes more helpful, at least in some sense. In general for this year I had envisioned interactive bulletin boards: Parking lots for questions, shelfie walls with information about independent reading progress, a wall where we track out movement through the writing process. I also knew exactly how each board would connect to the idea of building relationships and creating the kind of classroom environment I wanted. Knowing that I’d be in someone else’s space, I had planned to rotate them as necessary. My saving grace: Padlet and my school’s LMS.

Padlet "Bulletin Board" for the moveable classroom.

I’ve gone Padlet crazy in the past month and a half. Padlet is, essentially, a digital wall or bulletin board where you can post ideas, files, and work collaboratively. I’ve used it many times before. I’ve created word sorts, used it for collaborative planning before shared writing, and, in a non-school use, to plan a trip to San Francisco. It seemed like the perfect tool for an interactive bulletin board. Kids could create posts to share information, they could comment on each other’s work (and we could work on digital citizenship!). We’re tracking independent reading and we’re tracking writing. Embedding the media into our LMS allows me to have it visible to students, and allows me to easily give feedback through rubrics, in addition to the comments I make on individual posts.

They made the Power Rangers connection. Hooray for student voice.

So far the kids are engaged, and rather than being a substitution for a traditional bulletin board, which is what I was initially looking for, it is an the tech is an augmentation of the interactive bulletin board. I’m definitely more engaged than I would be with a traditional interactive bulletin board. I’ve even created one for Romeo & Juliet (our next unit) where students can make connections between characters to help them understand who is who (something that’s been an issue for kids every time I’ve taught the text).

Anchor Charts

This is the one I still haven’t figure out. Anchor charts should be up on the wall so they can be referred to frequently. We come back to them and review them. Students can look at them while doing work. I have a few ideas. Perhaps ThingLink? I know I can embed them in my LMS, but will they be as visible when the students need them?

Any ideas? How do you deal with bulletin boards and anchor charts when you’re working in other people’s classrooms?

Teaching in Other People’s Spaces # 1: Classroom Seating & Set-up

Teaching in Other People's Spaces Part 1: Classroom Seating & Setup

I’m teaching English again for the first time in a while. Two years ago I cotaught with my friend and colleague Drew Murphy, but it’s been six years since I’ve had an English class all to myself. This year’s teaching doesn’t have much in common with previous years. The last time I taught English solo it was a totally different curriculum, at a totally different school, and with a totally different population of students. But it does have one major thing in common: I’m teaching in someone else’s space. Actually, I’m teaching in more than one someone’s space. This has posed a number of challenges both for the kind of classroom environment I want to create for my students and in terms of every day logistics, from classroom seating to anchor charts to setting routines for instruction.

I assumed since schools are frequently challenged for space, other people must have written about this. I asked Google. Shockingly, Google found nothing relevant (this could mean this series of posts will have a serious SEO challenge, or it’s just me and it means everyone will find me!) So here is the start of a series on how to teach classes in other people’s spaces. First up, classroom seating and set up.

Challenge: Arranging Spaces

I am currently teaching in two different classrooms. Thankfully, both of the teachers have been open and welcoming to me and my class. However, they each have a completely different size and shape. They have completely different classroom seating and furniture. The teachers in each room are teaching completely different subjects have completely different styles.

Classroom seating in a 5th grade math/science room

One is a 5th grade math and science classroom. It has soft, warm lighting and big windows that look out onto the river. Orange node chairs are arranged in a circle, and there’s a comfortable couch in one corner for independent reading. There is no teacher desk, just a stool next to a low cabinet that the teacher uses as a work station as needed.

The other is a health classroom where primarily 7th-10th graders have class. Folded up tables are pushed up to one side of the room. When unfolded and set up, the tables barely fit all of the students. Chairs are arranged in a circle to facilitate discussion, but don’t have a writing surface attached like the chairs in the other room. A large teacher’s desk dominates one corner of the room.

The bigger challenge was in the second room, where we would have to set up the room in a configuration where everyone could see the board, and everyone had space to write and take notes. We also had to do it as quickly as possible. And I had to run from a meeting on the other side of the building. Depending on which class it is, tables might be set up, and they might not be. This is a lot of variables for me, and definitely a lot of variables for a class of 22 eighth graders. We established a routine. If tables are not set up, they would take care of arranging them. Which has worked out well. I’m still trying to figure out the best configuration for the tables so that everyone has space. But we’re (slowly) getting there.

Challenge: Creating a Proactive Classroom Seating Plan

The set ups of the two rooms are so vastly different, so it was difficult to assign student seats. And in my experiences doing it before, doing so ended up being confusing for the students and for me. So I decided to let it go. We had a conversation about the responsibility of being an 8th grader. I told them that they were allowed to choose their own seats, but with the caveat that they needed to make good decisions about where they would work best. I had to set clear expectations for what “working best” looked like. There also had to be clear consequences for not working well. The biggest issue with setting expectations and agreements was not having wall space to hang up the agreement (see next week’s post for more on that topic).

So far, this is working for us. Reminders to students to sit where they can focus have been helpful, although I’ve had to be creative with how to work around not really having space to post agreements. So far, I’ve set an expectation and they’ve met that expectation. I am worried about the students who have preferential seating as an accommodation. However, we sit in a circle most of the time and my instruction isn’t all that teacher directed. But I do need to be more aware of those students as I’m teaching.

Have you ever had to teach in another teacher’s space? How did you work with other people’s set ups and classroom seating plans?

Next time: The challenge of not being able to have bulletin boards and anchor charts.

My New Classroom Design

When I started my job a year ago, I went to look at my room–which is tiny and has no windows to the outside–and saw six student desks with chairs piled in the middle of the room, a giant teacher’s desk, one wall that felt like it was made of cardboard that was covered in deep scratches, the box for an active board, the cords for the yet-to-be-installed projector dangling from the ceiling, and what I now affectionately refer to as my “window to nowhere”. I’m not ashamed to admit it–I burst into tears. Ordering appropriate furniture, I was told, was out of the question. Thankfully, I had some wonderful colleagues who scavenged bookshelves and better furniture for me from around the school while I was in new staff orientation. I worked with what I had. I made it better, but never really succeeded in finding something I was happy with. Part of it is the size of the room, part of it is the furniture, and part of it was having trouble figuring out what I wanted learning support to look like for me and my students. And, if I’m totally honest, part of it was being overwhelmed by being new and frustrated with what I had. Classroom design was the furthest thing from my mind most of the year.

This year I decided to start setting up the Friday before staff had to be back. I started by trying to track down the IKEA cube shelf that I had ordered for manipulative storage. Nope. Never ordered. I found some boxes to pack the materials in and then got started on fixing the window to nowhere. Last year one of my adorable M1s suggested that I put up a poster of the Brooklyn Bridge so I could have a view just like Ms. Other Learning Specialist. While it was an adorable suggestion, I could see how it could maybe, possibly, be misconstrued by adults and might seem passive aggressive. Just a bit, right?

So I turned this:

My window to nowhere. Complete with a sequined bracelet, lost eternally behind all of the lockers.

Into this:

IMG_20140828_174626

I decided that black and white letters would really pop on my newly pained, extremely bright green door. So I picked these up from Staples. And voila!

Classroom design: My new door
My new classroom door

I covered my icky wall in purple paper and set up sections for Essential Questions, Problem Solving, and Writing.

IMG_20140828_174730

Here’s a close up of my EQs:

IMG_20140828_174711

A trip to the Container Store and I had storage bins for manipulatives–I can’t recommend these bins highly enough. They have smaller containers inside where I was able to sort things by type. If I had manipulatives for more that my groups of 5 or 6, I would probably use the trays to make sets of just enough per table and have students come up and take a tray back to their group.

IMG_20140829_075528

IMG_20140829_075839

I also decided the solution to my lack of shelving for storage lay in my magnetic walls–the magnetic pencil holders that kids use in their lockers. And I printed out some cute labels from TPT that continued the green, purple, chevrons & polkadots theme. I need to pick up a few more this weekend. I’m hoping to have bins for highlighers, pencils, pens, markers, scissors, and Expo markers. For the Expo markers I’m going to pick up one of the divided containers so I can put the markers and eraser in the same bin.

IMG_20140829_074821
Obviously, I need a better way to affix these…magnets?

I also got a few of the same magnetic containers I use to store my spices and turned them into storage for paper clips, tacks, and…something else…not sure what goes in the middle one yet.

IMG_20140829_074810

As far as furniture goes, after much consideration, I decided to pass my comfy red chair along to one of my colleagues in the English department who has more space, and is looking into setting up an independent reading program for her 7th graders. As much as I love the idea of having a comfortable space for students to do independent work, who got to sit in the chair became a constant source of argument amongst the students–even when I set a schedule for who got to sit in the chair when. And for many of the students, this was the first time in middle school that they had a chair like that to sit in, so it was really difficult to shift their thinking from “this is a place to relax” to “this is a comfortable place to do work”.

After much shifting of tables and staring at the room hoping that a good plan would reveal itself, I finally decided to put the tables along the wall, and one desk opposite. The students would be able to do both independent and collaborative work at the tables, and I could use the desk for either a student who needed some extra space around her to focus or to work with students 1:1. The one comfy touch I kept were the cube footstools that students often sit on to do work. They’re soft enough to be a bit bouncy for kids that need to fidget, but just the right height to put at the tables or the desk. They’re also great for sitting on when using laptops, a small whiteboard, or writing on a clipboard.

How did you set up your room this year? For those of you who do intervention, what types of furniture/configuration have you found best for working with students?